Is your enterprise on the hunt for streamlined operations? Implementing ServiceNow SSO (Single Sign-On) on Android devices using Hypergate Authenticator could be the game-changer you need.
This guide specifically focuses on how to enable SSO for ServiceNow using Hypergate Authenticator on Android devices. We’re primarily leveraging SAML protocol for integration, a popular standard for SSO. This is, however, with an AD FS (Active Directory Federation Services) infrastructure in mind as the identity provider (idP). If your infrastructure utilizes idPs like Okta or PingFederate, don’t worry; these can be just as compatible. Furthermore, you can also use OAuth, OpenID Connect, or WS-Fed, depending on what your idP and service support.
Overview of ServiceNow SSO on Android
ServiceNow, with over 6,200 customers, is a leading light in the digital workflow sector. Its Android app, when integrated with SSO using Hypergate Authenticator, significantly enhances user experience.
Prerequisites for Implementing ServiceNow SSO
- Hypergate Authenticator for iOS or Android
- Microsoft AD with AD FS configured
The Goal of ServiceNow SSO Integration on Android
The goal is to have the best possible user experience on the mobile. At the end of this guide, your user will be able to use the application without the need to enter any credentials. The following video shows you what the user experience looks like on a newly enrolled mobile device (the app has never been opened before):
Step-by-Step Configuration of ServiceNow SSO on Android
Firstly, activate the Multi-Provider SSO Plugin on ServiceNow:
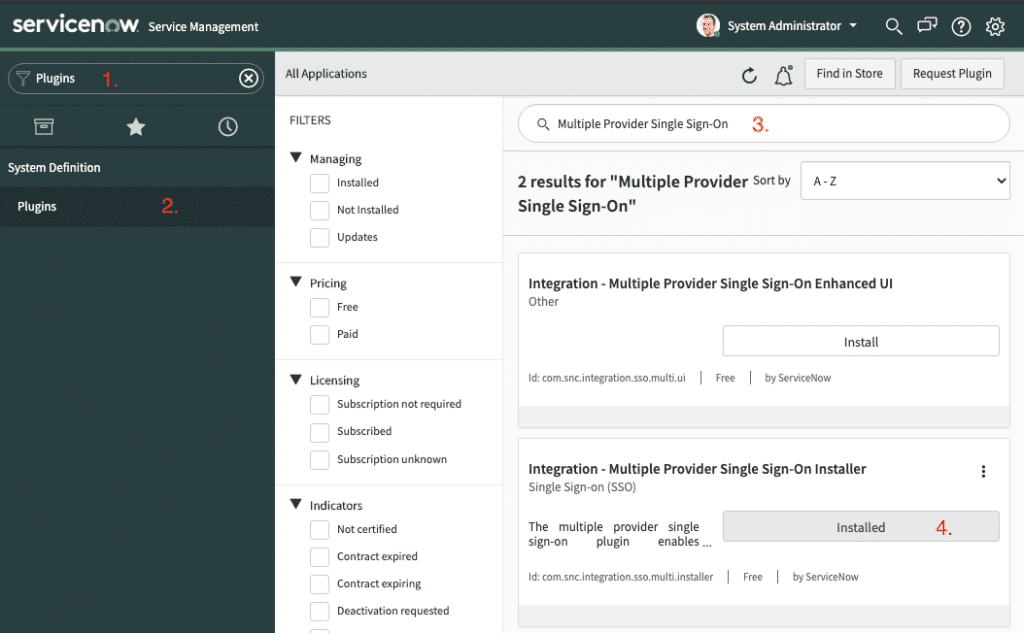
- In the navigation search field, search for “Plugins“
- Open System Definition – Plugins
- Search for “Multiple Provider Single Sign-On“
- Click on Install
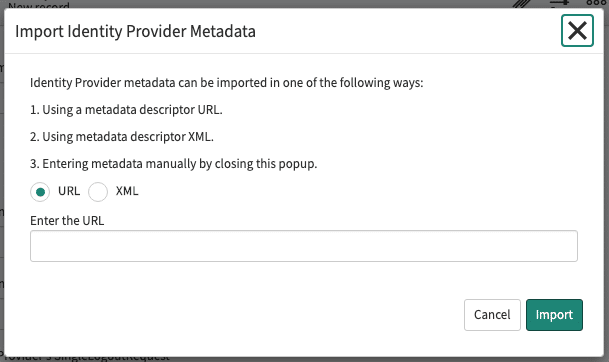
After successfully installing the “Multi-Provider SSO plugin“, we need to create a new Identity provider. This can be done by:
- Opening Multi-Provider SSO – Identiti Providers
- Click on New
- The following dialog should show up:

- Enter the FederationMetadata URL of your ADFS, this should look like the following URL: https://your-adfs-domain.com/FederationMetadata/2007-06/FederationMetadata.xml
- Click in Import
The following parameters need to be adjusted in the tab Encryption and Signing:
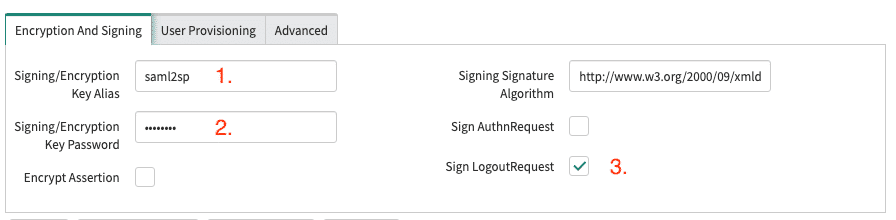
- Set the Signing/Encryption Key Alias to saml2sp
- Set the Signing/Encryption Key Password to saml2sp
- Check Sign Logout Request
The following parameters need to be adjusted in the tab Advanced:
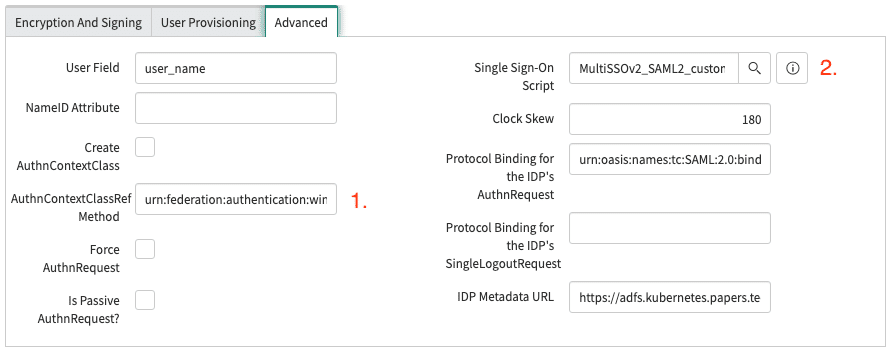
- Set the AuthnContextClassRef Method to urn:federation:authentication:windows
- Set the Single Sign-On Script to MultiSSOv2_SAML2_custom
After configuring the Identity Provider correctly, click on the Generate Metadata button and save the resulting configuration in a XML file called servicenow-metadata.xml. We will need it later when configuring AD FS.
Diving into ADFS Configuration
On the AD FS side we need to add a new Relying Party Trust. Just follow these steps:
- Open the Server Manager
- Click on Tools and open the AD FS Management
- In the Management Console right click on Relying Party Trusts and select Add Relying Party Trust…
- The Wizard should start, select Claim aware and click on Start
- Select Import data about the relying part from a file and select the previously saved servicenow-metadata.xml and click on Next
- Fill in a display name
- Leave the Access Control Policy with Permit everyone
- Confirm the configuration by clicking Next and finish the Wizard
Concluding ADFS Configuration Steps
To conclude the ADFS configuration:
- Right click on the newly created Relaying Party Trust
- Select Edit Claim Issuance Policy…
- Click on Add a Rule…
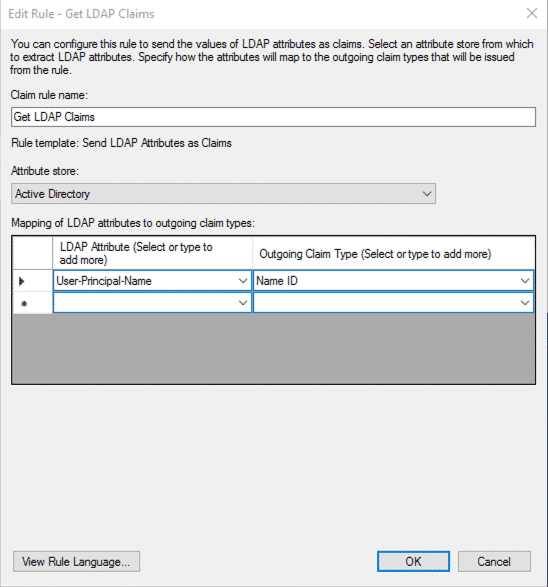
- Select Send LDAP Attributes as a Claim as template
- Enter the following details:
- Set the Claim rule Name to Get LDAP Claims
- Set the Attribute Store to Active Directory
- Add a new row to the Mapping and set User-Principal-Name to Name ID

- Confirm the configuration with OK and Add antoher Rule
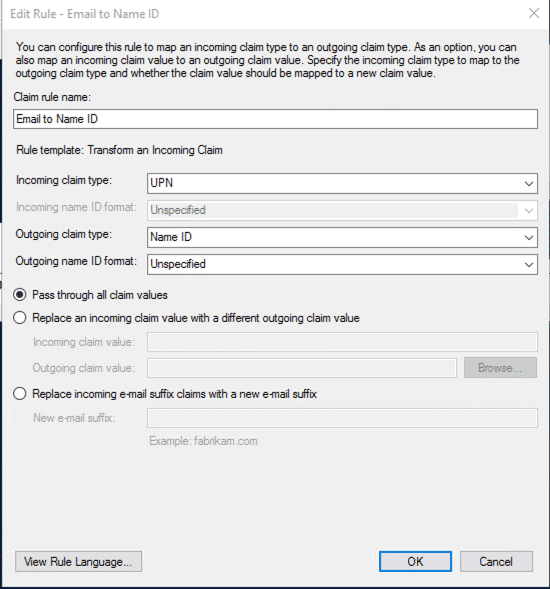
- This time select Transform an incoming Claim as template
- Enter the following details:
- Set the Claim rule Name to Email to Name ID
- Set the Incoming claim type to UPN
- Set the Outgoing claim type to Name ID
- Set the Outgoing name ID format to Unspecified
- Select Pass through all claim values

The AD FS configuration is now done. We can now mark the Identity Provider in sevice now as Active and set it to Default.
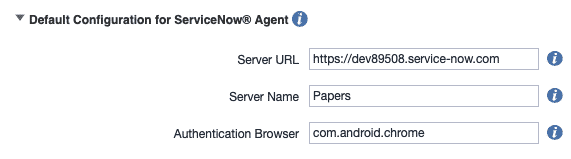
Final Phase: Mobile Configuration for ServiceNow SSO
The only thing remaining is to preconfigure the Service-Now app for our Tenant. This can be done with a managed confguration: